
Receive Free Shipping On All System Orders!
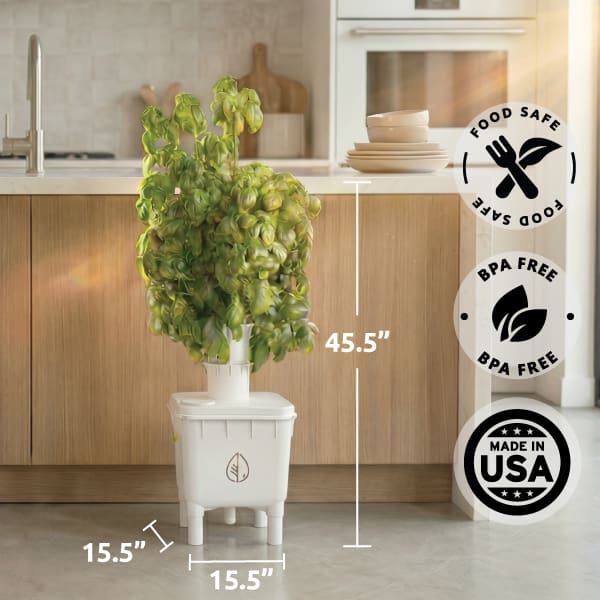
• Feeds 1-2 people, no subscriptions required.
• Choose your own seed sources.
• USA made & supported with better materials
• Compact, Food-Safe, BPA-Free
• Industry-leading aeration & plant growth
• Easy-to-clean & maintain
• Auto-watering enabled
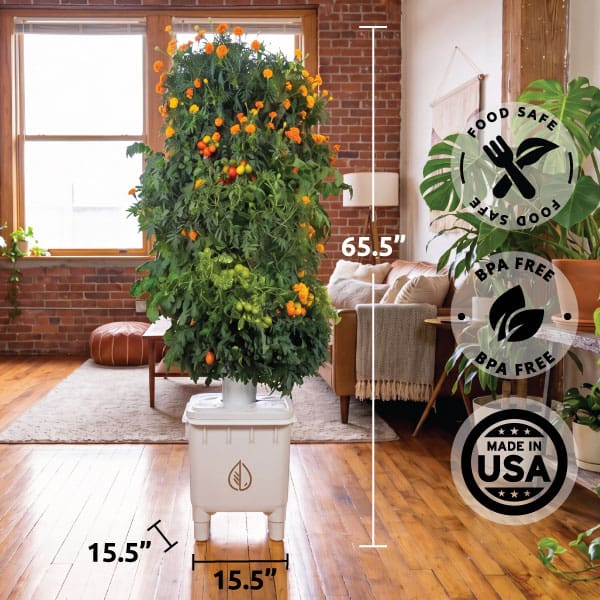
• Feeds 2-5 people, no subscriptions required.
• Choose your own seed sources.
• USA made & supported with better materials
• Compact, Food-Safe, BPA-Free
• Industry-leading aeration & plant growth
• Easy-to-clean & maintain
• Auto-watering enabled


Our Byron Center, Michigan Manufacturing organization has been around 45+ Years! We specialize in making high quality hydroponic systems and have been working with commercial, professional, and DIY hydroponic growers for almost a decade. We don't cut corners.
We created the Hydra Tower to let you easily harvest fresher, healthier, home grown food — no matter your schedule, space, or gardening experience. We put this into a compact "home system" that utilizes commercial grade components and technology. Enjoy the journey and keep growing, we look forward to your success that our vertical gardening systems can bring!
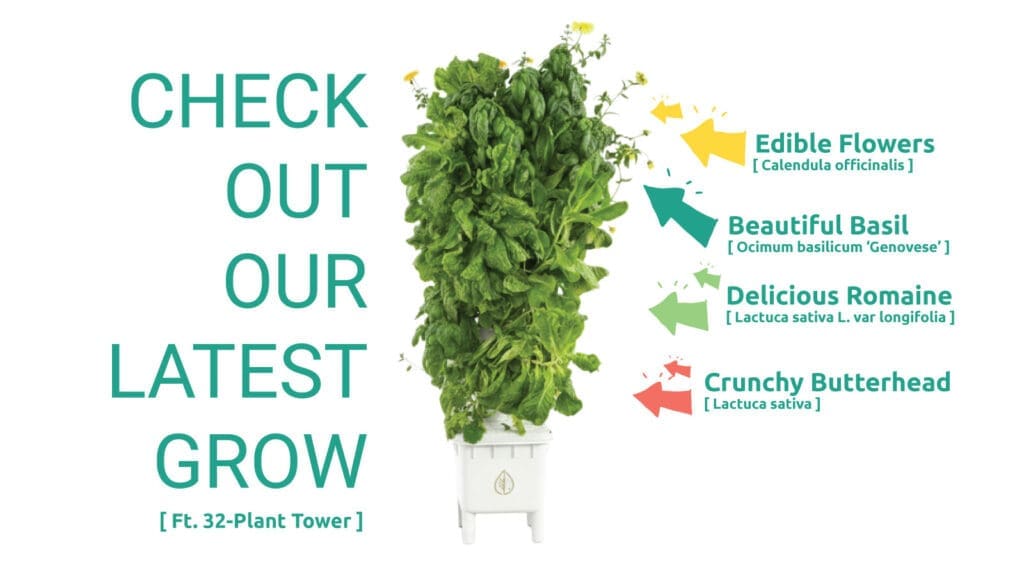
Hey, guys. I'm Carissa. I'm here with Hydra Unlimited. Today, we're gonna build the Hydra Tower, your very own vertical hydroponic garden. This is a super cool hydroponic system that helps plants grow strong and healthy. No soil needed and no pesticides necessary. The Hydra Tower is constructed with food grade, UV stabilized, recyclable, BPA free plastic. Growing is so easy with the Hydra Tower. It's one step seed and grow. No thought required afterwards. We have created a how to get started mini series and this covers all the steps needed for successful operation from assembly through maintenance. Let's get started. First, open up your hydro tower box and carefully take out all the parts. Now one of the great things about all hydroponic systems from Hydra Unlimited is that everything is designed, engineered, manufactured, shipped, and supported right here in Michigan. And as you know, Michigan has some crazy winters. So I want fresh food and vibrant colors around me during those cold days. Now that you have everything out of the box, laid out and organized, you're gonna wanna find your four leg extensions. They're the pieces that go under your bucket. Insert each leg extension into the bottom of your hydro bucket. These will help lift your bucket up to the right height. Next, you'll be taking your quick lock drain plug and installing it into the bottom of the bucket. All connection points on the tower use quick lock fittings. It's awesome and is super easy to use. So after you do the plug, great job. Your base is ready. So find one tower base section and its locking nut. Whether you're using the sixteen or thirty two plant models you'll be using two base sections. Now you're gonna place the tower base module into the center hole in your bucket, then screw on the locking nut underneath to hold it tight. What this does is keep your tower base nice and secure. When you're putting a second base tower in, try and make sure that these cutouts are facing the corners that way you can see easily how much water is inside. Now it's time to build your growing tower. Find your water pump and the green hose with quick lock fittings. Now you'll want to put the two fittings onto the water pump. The straight one goes at the top here and you screw it in just hand tight. Then you'll want to place the screen fitting and screw it in again hand tight. You'll now want to grab the green hose and attach the gray straight fitting onto the hose to your pump. Place the pump at the bottom of the bucket in one of the back two corners. Next, you'll wanna put the bucket lid on top, but make sure that the pump power cord and the hose are coming out of this little slit in the side. Now it's time to build the plant tower and the top cap. There's gonna be four sections for the sixteen plant tower and eight for the thirty two one. Today, we're doing the sixteen. You're gonna wanna start with one and slide each new section into the one below it. When you line them upright, the plant holes will be turned a little, about forty five degrees, so they're nicely staggered all the way up. Once all sections are stacked, place the sleeve and then the top cap onto the very top. The top cap has a quick lock fitting where your water line connects. Now connect the three quarter inch quick lock elbow fitting to the top aerator. That's the piece that lets the water flow through the tower. So again, we wanna make sure your pump power cord and the water hose are both coming out through the small side slot in the lid, not the round hole. The port cover is where you'll add water and nutrients once the assembly is completed. Now the last thing you'll need is your very own smart plug. Time to set up your g home smart plug for the water pump. Inside the box, you'll find your smart plug and a quick setup guide. You can download the g home app from the Apple App Store or Google Play. There's even a QR code on the box to make it easy. Once you connect it, you can use the app to turn your pump on and off and even set timers, all from your phone. That way, your plants get the perfect amount of water every day. And that's it. Your hydro tower is all set up now. Now you can start growing fresh, healthy plants right at home. Great work. Awesome. If you're new to growing or would like a few more tips on beginning with your hydro tower, be sure to check out our getting started series. If you have any questions, you can reach our support team anytime, eight AM to five PM Eastern Standard Time. You can also reach out to us via live chat feature on our website, directly on social, or you can text us or call. We'd love for you to connect our community online, and we'd love it even more if you share your upcoming Grow progress.
|
Uploaded
Failed
|
 |